
 Diablo 2: Resurrected
  Last Epoch
  Diablo 4
  Path Of Exile
  Elden Ring
  WoW WotLK Classic
  Runescape
  Lost Ark
  WOW Classic SOD
  Albion Online
  SWTOR
SWTOR  Animal Crossing
  Steam
Steam 


Are you sure you want to delete all items?
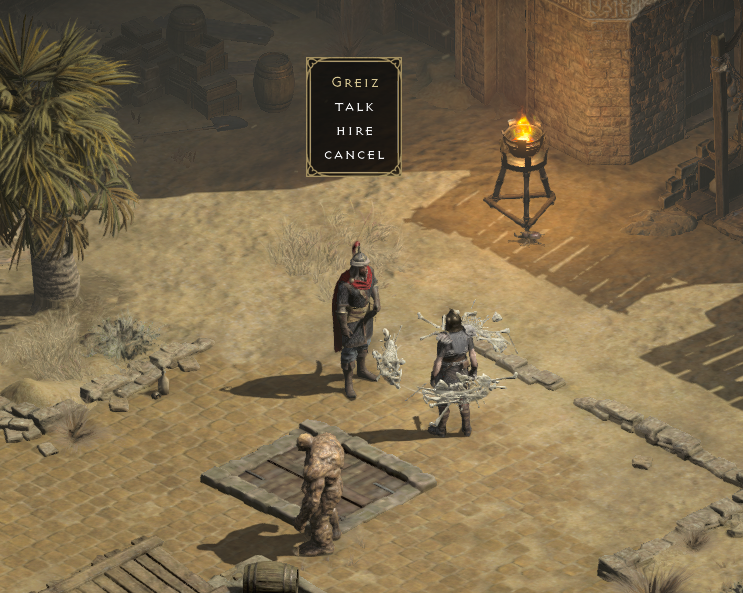
Which aura is the best for your Mercenary in D2R?
Feb-22-2024
In both the original and the recently popular resurrected version of Diablo II, players looking to enhance their gaming experience must not only improve their character's overall strength but also pay attention to the proper selection of mercenaries. Mercenaries in Diablo II include the First Act's Rogue Archer, the Second Act's Desert Mercenary, the Third Act's Iron Wolf, and the Fifth Act's Barbarian. However, the Second Act mercenaries with specific auras are the most commonly used. As melee physical damage dealers, they serve as excellent tanks and provide significant output, while their auras greatly enhance the character and team.
In the old version, the auras of the Second Act mercenaries were not as detailed as those in the resurrected version, requiring players to choose mercenaries with specific auras based on the difficulty and type they were facing. The aura types were the same for normal and hell difficulties in the old version, but the aura levels were higher. It is recommended to consider normal and nightmare difficulties when hiring.
In the resurrected version, the attributes and aura levels of the Second Act mercenaries have been updated to be consistent across all difficulties. However, normal difficulty only offers three auras: Blessed Aim, Resistance, and Prayer. For nightmare or hell difficulty, players can choose from six auras, including Might, Holy Freeze, and Thorns.
1) Prayer Aura
Choosing a combat-type mercenary at normal difficulty, the aura effect heals all nearby units. If equipped with a runeword weapon "Insight," the mercenary can simultaneously provide mana and health regeneration effects. The contemplation aura granted by "Insight" synergizes with the mercenary's own Prayer aura, doubling the healing effect, making it very practical for sustaining health in the early to mid-game.
2) Blessed Aim Aura
Choosing an offensive-type mercenary at normal difficulty, the aura effect increases the physical attack hit rate for themselves and teammates, suitable for playstyles that require a high hit rate, such as Paladins without "Regret" runeword, Dragon Talon Assassins, Bow Amazons, and most physical damage-dealing Barbarians.
3) Resistance Aura
Choosing a defensive-type mercenary at normal difficulty, the aura effect boosts physical defense for themselves and teammates. This aura is less common in the late game and is suitable for playstyles with low base defense that don't need to run around killing monsters (defense value is 0 while running), such as spellcaster characters and Trap Assassins. It can also be useful for farming the secret cow level.
The cow level is a great place to farm for materials and runes due to its dense monster population. Apart from the Holy Freeze aura (which can slow down mob gathering and is not recommended for efficient late-game farming), other aura mercenaries can be chosen based on character needs.
4) Might Aura
Choosing an offensive-type mercenary at nightmare difficulty, the aura effect increases the physical attack power of all nearby units, making it popular and suitable for most physical damage-focused playstyles, such as Bow Amazons, Dual Sword Paladins, War Cries, Druids, physical Barbarians, and Necromancers focusing on summoning.
5) Holy Freeze Aura
Choosing a defensive-type mercenary at nightmare difficulty, the main effect of the aura is to slow down nearby enemies and add some cold damage to attacks, significantly improving the survival of squishy characters in dense monster scenarios. It offers great value for money in the early to mid-game and is suitable for scenarios where control is needed to clear monsters slowly. It is also a good choice if your skill level is not keeping up and you are prone to crashing.
However, this aura is not recommended for certain scenarios, such as the previously mentioned cow level where efficient mob gathering is needed for late-game farming. Additionally, it is not suitable for playstyles that require corpses (as it freezes and shatters them), such as Trap Assassins, Necromancers focusing on Corpse Explosion, and Barbarians farming Act III's "Travincal" for item finding skills.
6) Thorns Aura
Choosing a combat-type mercenary at nightmare difficulty, the aura effect reflects melee physical damage taken by the mercenary. It has some use in normal difficulty for taking down bosses, but is almost useless in the late game, especially during mass farming, making it the least popular aura and generally not recommended.
However, the choice of mercenaries with specific auras is not fixed and should be combined with the character's playstyle and main farming scenarios for a reasonable match.
Recommended news
-
The Epic Quest for Great Runes in Elden Ring
Jun-24-2024 -
Diablo 4 Season 4: My Journey with the Druid Landslide Leveling Build
Jun-22-2024 -
Diablo 2 Resurrected Frenzy Barbarian? Here's Your Ultimate Guide!
Jun-21-2024 -
Last Epoch - Necromancer Build, Concentrates on Summoning Minions
Jun-20-2024 -

Is Elden Ring DLC: Shadow of the Erdtree worth playing?
Jun-19-2024 -
A Full Guide to Unleashing the Power of PoE Raise Spectre Best Monster
Jun-18-2024


www.mmoso.com is a professional gaming service platform dedicated to providing high-quality in-game currency and item trading services. We have rich industry experience and a good reputation, committed to creating the best game trading platform for every player. We are a trustworthy gaming service platform and will continue to improve to ensure that every customer can enjoy a pleasant gaming and shopping experience.


Registered Names and Trademarks are the copyright and property of their respective owners.
Copyright © 2016-2024 All Rights Reserved.

SIGN UP


LOGIN

